Monday, April 28, 2014

It's Nursery Time!

Life has been crazy and beautiful.  I haven't been on the blog in a while because I've been busy BEING PREGNANT! My Husband and I could not be more excited to be expecting a little girl.  

Being pregnant has certainly given me a run for my money. I had a brutal first trimester, a hectic second trimester, and now that I'm 36 weeks I am simply exhausted.  That being said, the time we have spent working on the nursery has been absolutely blissful.  I thought I would share our nursery transformation!


We are so happy with the final product and love spending time in this room.  This room was a guest bedroom before the transformation.  The first thing we did was rip up the carpet!  I wanted something durable and easy to clean, but didn't want to spend a ton of money.  We decided to put down vinyl plank flooring that runs about $1.79/sq ft.  My husband and dad were able to have the floor put down in about a day.  The wall color was left over from the guest room.  We knew we didn't want an overly "girly" room and the wall colors helped keep the space neutral.  We also painted the all the wood trim white which helped to freshen the space. 

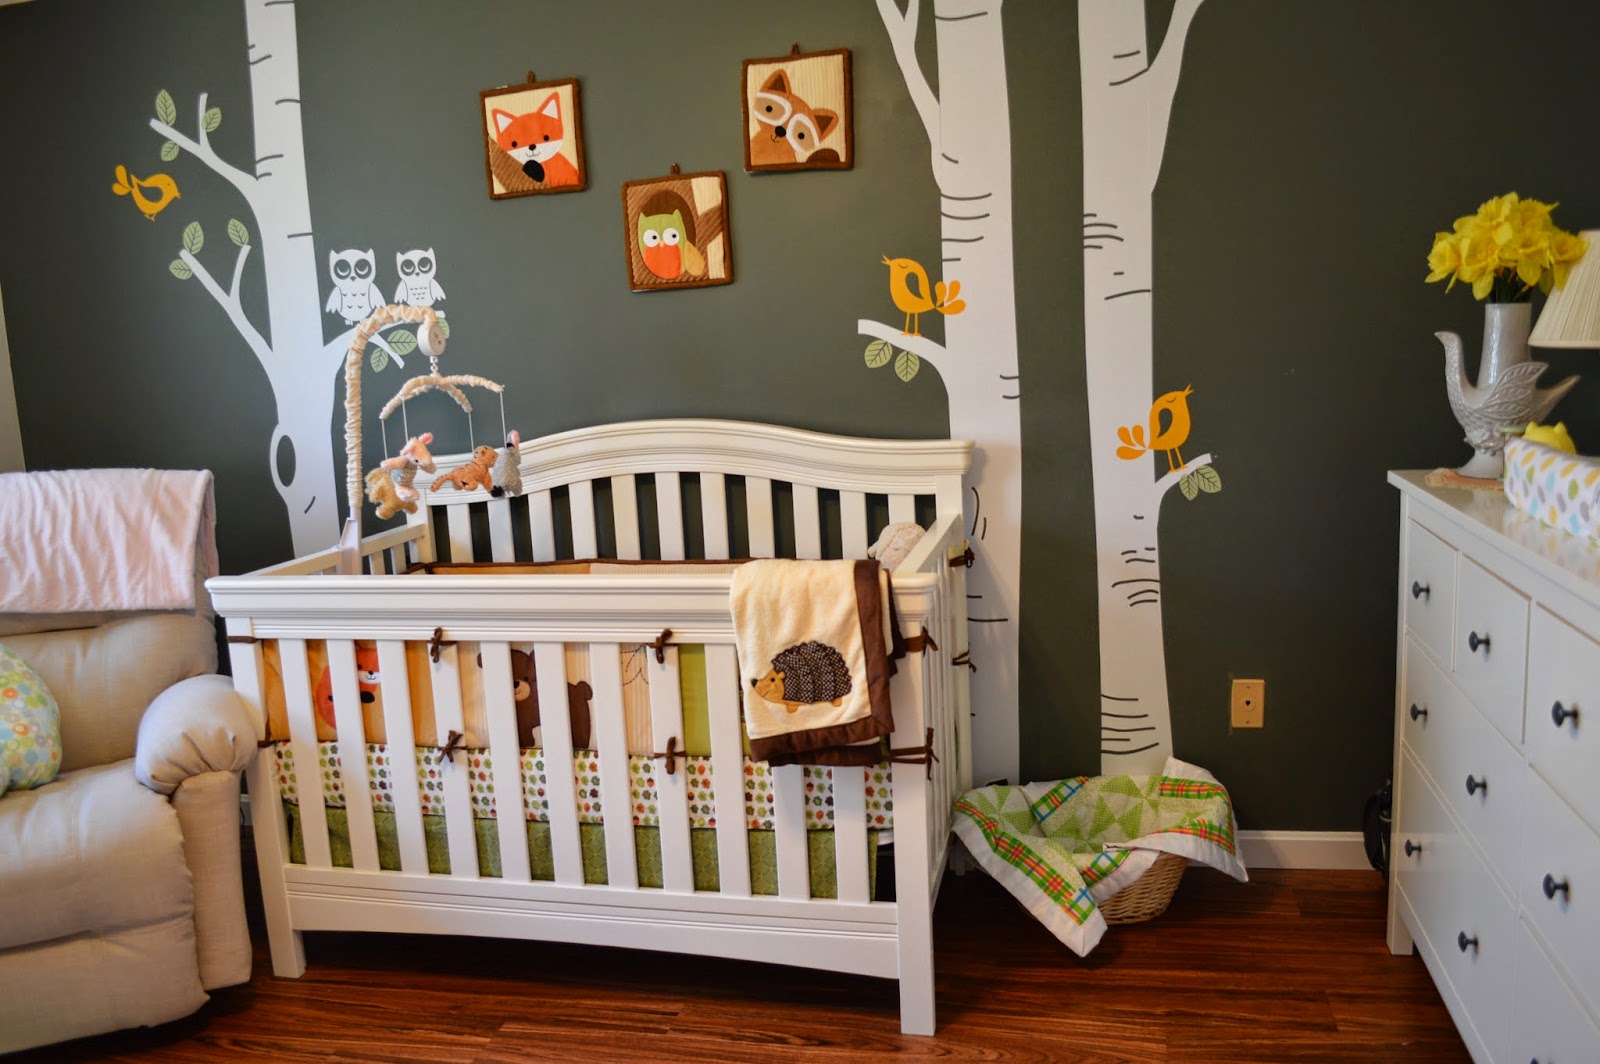
We found this Birch Tree Decal from LimeDecals on Etsy and HAD to have it.  The decal comes in several pieces and you can personalize the colors and placement of the branches, birds, and leaves. 

We got all new furniture for the room.  To help space out the cost of buying big pieces of furniture, we found it helpful to buy one piece per month, rather than go on a shopping spree and have to tackle a huge bill.

The Furniture:
Crib - Babies R Us
Dresser/changing table - Ikea
Bookshelf - Ikea
Chair - Barbos (custom made from a local Cape Cod furniture store)
Rug - Ikea


The bookshelf doubles as extra storage space with the use of these awesome baskets! 
 Add in a few personal touches and you have a whimsical shelf!
These adorable "Make Way for Ducklings" frames were a gift from Amy over at Creative Soul Spectrum.

We were also given this adorable handmade growth chart that matches our woodland/owl theme.

When it came to picking a changing table, I wanted to use a dresser that would be functional well past the diaper years.  We picked the Hemnes dresser from Ikea.  The height is perfect for diaper duty and the drawers have plenty of space for all the adorable essentials!

I found some great drawer dividers at Ikea that we perfect for separating onsies, socks, headbands, etc. 

Diapers and diaper essentials:
 Burp cloths, bibs, and misc items:
 The cutest little onsies and swaddle blankets (that will probably never be this organized again):
 Backup diapers, shoes, leggings, socks, headbands:
 Beautiful blankets:

The top of the dresser was dressed up with a changing pad, antique lamp, and a bird vase from Jonathan Adler.  

Baby girl is totally lucky and has her own walk-in closet where we are hanging little outfits and storing a stock pile of diapers and wipes. 


Transforming this room into a nursery has been so special.  My husband and I have had so much fun picking and placing each item.  We know that once she's here the neatness will be replaced with chaos, dirty diapers, and sleepless nights, but that's when the real fun starts. 

If I can offer one piece of advice, it would be to start working on your nursery early! You'll be amazed how quickly that baby bump gets in the way, and how easily you will become tired.  We started working on this room when I was around 20 weeks…and we are just about finished now that I'm 36 weeks! 

The countdown is on folks!!

Thursday, June 13, 2013

Game of Thrones Drawing Tutorial


After the tragic conclusion of season three of Game of Thrones, I wanted to try a pencil drawing of Daenerys Targaryen.  Mind you, I haven't done any graphite pencil drawings since college so the thought was somewhat daunting. Fortunately, once I had my sketch down it all came back to me!

I started off by drawing a light sketch. Try not to make your lines too dark, we will use sharp and soft edges to build the shape.

Once the sketch was down, use a darker grade pencil to start enhancing your dark areas.

Starting to look like a face!  Look to your reference photo and notice the really dark areas. If you build the dark areas you will be able to blend out and create the softer/lighter areas. Look at the nose, see how we can start to create shape by blending the darks?


When you are ready to blend, a tortillon tool is best.  It's basically tightly rolled paper that allows you "push"the graphite around to create that blended look.


As you blend, you may find some of your dark areas have lost some of their depth. Don't be afraid to go back in with a darker pencil to continue to build the levels!

Woof, time to start with the hair.  Drawing/painting hair has been an evil nemesis of mine since I first started portraits.  I started with wavy lines and used varying depths of shading to create the flowing appearance.
 I found that is was easier to add the background at this point so I could use it to show the dimension between the head and the background.
When adding the dark pencil for the shirt, I went back in with an eraser to add highlights.  Once you have your highlights, you can enhance them by using a darker pencil around the highlight. Adding a part in the hair made a huge difference!


For the final touch, I went in with my eraser and erased some fine lines to add texture and highlight to the hair, and Viola!
Have fun!

M.

Tuesday, April 16, 2013

Liebster Award


(Meghan at Make Something Daily gets credit for making this fantastic animated award image).


Last week, Sharon at Desert Willow Lanegave me a Liebster Award! Julia from  It's Always Reutten explains that "The Liebster Award is given from one up-and-coming blogger to other up-and-coming bloggers in an effort to support and recognize bloggers with less than 200 followers. Liebster is a German term of endearment; so we are expressing our support for one another through this award." So here we go!

The Rules:
Each blogger needs to:
1. Post 11 random facts about themselves;
2. Answer the 11 questions set out by the person who gave you the award;
3. Choose 11 new bloggers to give the award to and link to them in your post;
4. Create 11 new questions for the newly awarded bloggers to answer;
5. Comment on each newly awarded bloggers blog to let them know about the award; and
6. You cannot tag back the person who awarded you the Liebster Award!


11 Random Facts About Me!

1. I love raw oysters. 
2. I work the night shift as a registered nurse.
3. My cat and dog are like my babies.
4. I speak Spanish and I am learning Swedish.
5. I have an unhealthy obsession with black olives...they are like Pringles...once I start I can't stop.
6. I met my husband in art history class in college. 
7. I have dozens of unfinished paintings. I am notorious for not finishing art projects.
8. I have tendency to be indecisive, as demonstrated by my two, unrelated, bachelors degrees (one in Psychology and one in Nursing).
9. I really, really like airports. 
10. I refuse to spend more than $20 on a pair of shoes.
11. 

My Answers to Sharon's Questions:

1. What were your top three favorite cartoons when you were little, and do you still watch any of them? 
   1) Classic Disney cartoons (Mickey, Chip & Dale, etc.  2) Tom & Jerry 3) Daria
2. What's your favorite type of food? (Mexican, Italian, Chinese?)
     Mexican/Central American. Not the imitation stuff. The real, Pico de gallo smothered, black bean, and corn tortilla stuff.
3. Cake or raised donuts?
   Cake.
4. What inspired you to start your blog?
     I have always loved making art. I would have people ask me about my style and process of painting. Initially, I thought the blog would only be for painting tutorials.  I quickly realized that I make all kinds of art and crafts and that my paintings often take a long time to complete.
5. What do you love most about blogging?
   I love reliving the creative process when I write about making art. By going through the tutorial process, I often find ways that I could improve the process and relive the things that worked!
6. What do you love least about blogging?
   Sometimes my art is very impulsive and I work so quickly that photographing the process is counterproductive. Then when I finish I think "this would have been perfect to blog about!"
7. What's your idea of the perfect day?
    Enjoying a hot cup of black coffee out on my deck. Spending a relaxing day with my husband and taking our dog for a hike in the woods. Coming home and slapping some paint on a canvas. Having a home-cooked meal and a glass of wine. 
8. If you could change just one thing about yourself what would it be?
  I am a "visual person". I struggle to comprehend new ideas/suggestions unless I can see them in front of me. Needless to say I do a lot of sketching and I am constantly asking my designer husband to "photoshop" something so I can see it.
9. What's your best attribute?
   I am compassionate in nature. I love being a nurse because I truly love helping people in the healing process.
10. Which blogger inspires you most, and why?
   I am drawn to bloggers that are raw, honest, and creative. One of my favorite bloggers is Jen from iHeart Organizing. Jen has amazing organizational tips, projects, and printables. I love that Jen is not afraid to admit that she is not an expert in all that she blogs about. Her honesty about her trials and errors help her readers say "hey! I can totally do this!"
11. If you won the lottery what's the first thing you would do and would you keep blogging?
  After paying off some bills and paying down the mortgage, I would immediately book a world-wide trip. 


Drum roll please!
The Liebster Goes to...

Megann from Megann's Kitchen
Megan from Lydia's Corner
Laurence from Storage/Glee
Candice & Vanessa from When Decades Collide
Jen from Cameron & Co.
Cathlin from A First Grade Journey
Julie from Where We Are
Anglea from Diary of a Chair

My Questions for the Winners!

1. What is the one food item you could never live without?
2. If you were given a shopping cart to fill for free at your local Arts & Crafts store what items would you grab first?
3. What do you enjoy most about blogging?
4. Dogs or cats?
5. What is your dream vacation spot?
6. What skill do you have that you are most proud of? 
7. If given $1000 to be used towards your blog, how would you spend it?
8. If you could be any Disney character, who would you be?
9. What color do you use most in your home?
10. When buying furniture, do you prefer New, Vintage, or a mix?
11. Pepsi or Coke?

I really hope you check out the Liebster Award Winners and show your support!

-Molly


Thursday, April 4, 2013

Marion Rose Inspired Buffalo Painting


When my husband said he wanted a painting of a buffalo to put over our fireplace, I couldn't wait to get my brushes out and start painting!

We LOVE the "Bison Head Color Study III" painting by Marion Rose, so I decided I would try to replicate it.  If you are not already familiar with Marion Rose's art, please explore her site and let yourself get swept away in the amazing colors.  She was a master of bold, bright, and colorful pieces of American art.  Unfortunately, Marion Rose died in 2011.  Her art is a constant inspiration for me, so replicating one of her pieces was very special.

First grab some bright Acrylic paints and some large brushes.  I actually used a stain brush from Home Depot and found that I was able to create the best texture with this large type of brush.  I did use smaller brushes for the eye, horn, and some other highlight areas.  I wanted this painting to be massive, so I waited until I had a 40% off coupon at Michaels and bought a 36"x48" wrapped gallery canvas.


 Once I had a sketch down, I started with the background. Start by slapping, yes literally slap, the paint onto the canvas. Then alternate your brush strokes to create a textured/chunky appearance.

Now for the fun part! Building the Buffalo head took a lot of layers to create the depth, shadows, and contours.  Make sure to stop and wash your brushes every so often so your paints don't get muddy.

Don't be afraid to use black paint to really create your shadowed areas. You will be amazed how the layers will "pop" when the bright colors are bordered by darks.


I have always found eyes to be incredibly stressful.  They really help to bring emotion to your piece, so take your time! By adding a simple white highlight, you can create shape and realism to your eye.

 Before I put the brushes down, I went back with some bright colors to add last minute highlights.

This little Buffalo has a new home in our living room! I just love him, although next time I'll go bigger!


M. 

Wednesday, March 6, 2013

Monogrammed Door Decor


Want to create a personalized letter for your front door? Or make a lovely wedding gift for a couple that will finally share a last initial?  The possibilities for this Yarn Wrapped Letter are endless!

You'll need:

Wooden letter - available at most craft stores
Yarn - I used two different rolls of complimentary colors, one solid, one striped
Acrylic paint that matches your color scheme
Hot Glue Gun
Tape
Decorative Do-Dads


 Before I started with the yarn I painted the letter in a light green just incase the yarn couldn't cover all the corners.  (You will note that for a quick paint job, I don't bother using a palette that I'll have to wash)

Take an end piece of yarn and tape it as close as possible to the edge of the letter. The tape will help hold the end in place until you have wrapped it.

If you will be alternating yarn rolls, you will want to wrap a section and stop. If you are only using one color you simply continue to wrap until the letter is covered. You may have to go back over some parts, especially if you have a funny shaped letter, like a G.

If you are alternating yarns, wrap a few sections of one color and then go back and wrap with the next yarn roll.

 The corners and curves can be tricky! For this curve I wrapped in a V pattern, alternating from side to side so that it almost made a braid.  Once a section was wrapped, I put a small dollop of hot glue to hold the yarn in place.
**HINT: If you plan to put your letter on a door that gets a lot of sun, take a piece of scotch tape and stick it over the drop of glue, this will prevent the glue from heating up and sticking to your door!


 Once you have your letter wrapped, get out your decorative pieces and start playing around with the placement. Remember that this will be hanging so try to keep the weight balanced so your letter isn't crooked. Once you have settled on an arrangement it is helpful to take a quick photo.  You will have to take the pieces off so that you can glue them down in the appropriate layers, so having a photo of the intended arrangement can be helpful!
Once your pieces are glued, tie a small bow around the top section of your letter so you can hang it from a hook. If you have a letter that does not have a centered top (Y, U, I, L) you might find that attaching a hook on the back of the letter is the easiest. 


Hope you love it!

M.
Related Posts Plugin for WordPress, Blogger...