Monday, December 24, 2012

Painting Baby Ben


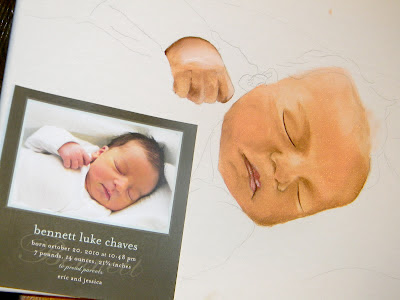
Recently, I have been really into giving art as gifts for special occasions.  So when my college roommate had her first baby, I knew I wanted to paint her something for mother's day.  What better subject to paint than her beautiful baby boy!

I thought I would share a tutorial for this painting.  I really enjoyed the process.  I used oil paints for this portrait so it took a LONG time (about a year all together). I used their announcement card as a reference photo.

The early photos are pretty poor quality, so bear with me.

Once I had a sketch down on the canvas I started filling in color.  By placing dark colors down early, I was able to build the shadows and details.


 At this point I really start going in with dark colors to highlight the shadows.  Pay attention to all the nooks and crannies! I've said it before, and I'll say it again: Don't be afraid to go too dark with oil paint! You can always lighten it by layering. That's the beauty of the medium.

I chose to use a thinning medium to change the consistency of the paint as the face progressed.  I use Turpentine. The Winsor & Newton Oil Painting Solvents are affordable and effective.  You can find them at your local craft store or Dick Blick online.


Thinning mediums (like Turpentine) are solvents that are mixed with oil paints to change the consistency. Basically changing the paint from fat to thin.  When you see oil paints that are glossy and shiny, chances are the paint was mixed with a thinner.

For the hair, I used a fan brush like this Royal Langnickel Sofia Fan from Dick Blick.

 This type of brush allows you to "fan" color on to the canvas, while creating a hair texture.

Here are some close-ups:


I went to Michaels to have this little guy framed. Their custom framing department is always helpful and they have a decent selection of frames and mouldings.


It was so special to give this portrait to my friend and hear now 2 year old Bennett point and say "that's Bennett!"

M.

Monday, December 17, 2012

Fast DIY Business Cards

The Problem: Need business cards fast!  The Solution: DIY!

A few weeks ago I was planning on attending a Crafts Fair.  I had ordered fancy business cards that were not going to be delivered in time and I really wanted to have a way to "tag" the wreaths I was selling and and have a way to spread my name. Also, let's face it, you feel pretty awesome when you can say "here, let me give you my card".  
I decided there was no time to have the cards done professionally, so I finally said "I can do this!"

First, I went to the store and grabbed a pack of Card Stock. I chose a multicolored pack that would cater to my indecisiveness and was more fun than a plain white pack


I had these two stamps that I've been dying to do something with, so I got them out.  If you're in a pinch your local craft store should have some basic stamps. If you have time, I definitely recommend browsing on Etsy!
  
Now, this is down and dirty business card making.  I am not proficient in the Adobe products (Illustrator/Photoshop), and my designer husband was at work, so I resorted to good 'ole Microsoft Word.  When you go to Word, start by figuring out what version you have  In Word 2003 or earlier versions, on the Tools menu, click Envelopes And Labels. In Word 2007 or later choose Labels from the Mailings tab.   On the Labels tab, click Options.  In the Labels Product list, click Avery Standard.   In the Product Number list, use 8371 or 5371.  This will allow you to use a business card template.   In the Address area, enter the address information for the business card.  
It will look something like this:
The only downside to using your fancy colored paper is that you will have to measure and cut the cards by hand.  I believe if you use the actual Avery Business Card Paper it is serrated.  The gridlines will not print so you will have to measure and cut your cards.  A standard business card is 2" x 3.5".

I made separate templates for my front and back and then reversed my printing so that the sides would match up.  

Once everything was printed, I took my stamps and got creative!

Here are my front and back views:
 DIY Business Cards just like that!  I love the multicolored cards and the charming stamps, they feel very "me"

M.


Related Posts Plugin for WordPress, Blogger...